Friday, May 8, 2015

Our Animation Story


Our focus statement is "Logan Challenges Schedule". This isn't my story personally but it is Logan's. Our Animation is about a kid that goes to school on the first day and having trouble with his schedule and feeling that it's like a monster.

The main lesson for our story is to learn how to overcome your fears and get through them over time. We displayed this in many ways with many different forms of animation.

We didn't really have good moments as a team. We mostly argued and as you can see, that is why we have 35 seconds worth of video. One good moment we had was when we finished a scene and got it in and edited quickly then began on the next one.


Lyrical Liveyhood

My favorite song right now would have to be Save Rock And Roll by Fall Out Boy ft. Elton John, and in that song there's these lines that I love that go, "How'd it get to be only me? Like I'm last kid still kicking that still believes. I will defend the faith, going down swinging. I will save the songs that we can't stop singing."
I love these lyrics because I like old rock and roll songs and they aren't really popular anymore. I think these lyrics symbolize the BEST era in life like 1980's where mosh pits were still a thing and crowed surfing and how they wish they could bring back times like that all the songs from before.

My team for this project is just Makena Kahananui, we're doing this alone. We picked Roger Rabbit by Sleeping With Sirens. We picked this song because it's about not being able to love and understand other people if you can't love and understand yourself and being able to get through things by yourself. 

Our music video is gonna tell a story about how I'm having a problem and I go to Makena for help but she can't really understand the situation I'm in, so I have to learn how to figure myself out and push through by myself. 

Friday, March 27, 2015

Typography Images

Typography is a way to express feelings, thoughts and/or a message in a picture with words. It can make a long lasting impact with the fact that it can get a strong message across to the viewer that can change minds or persuade.

My biggest challenge while doing this project was trying to figure out how to do certain things and trying to find the right words to describe myself. The 
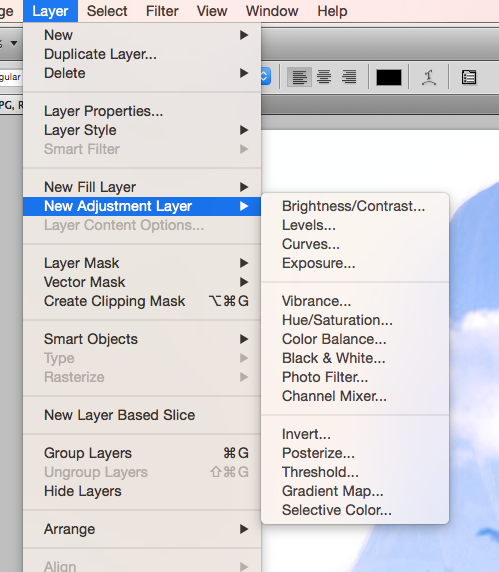
tutorial that Mr. Sanderl gave us also helped a lot when things were confusing.


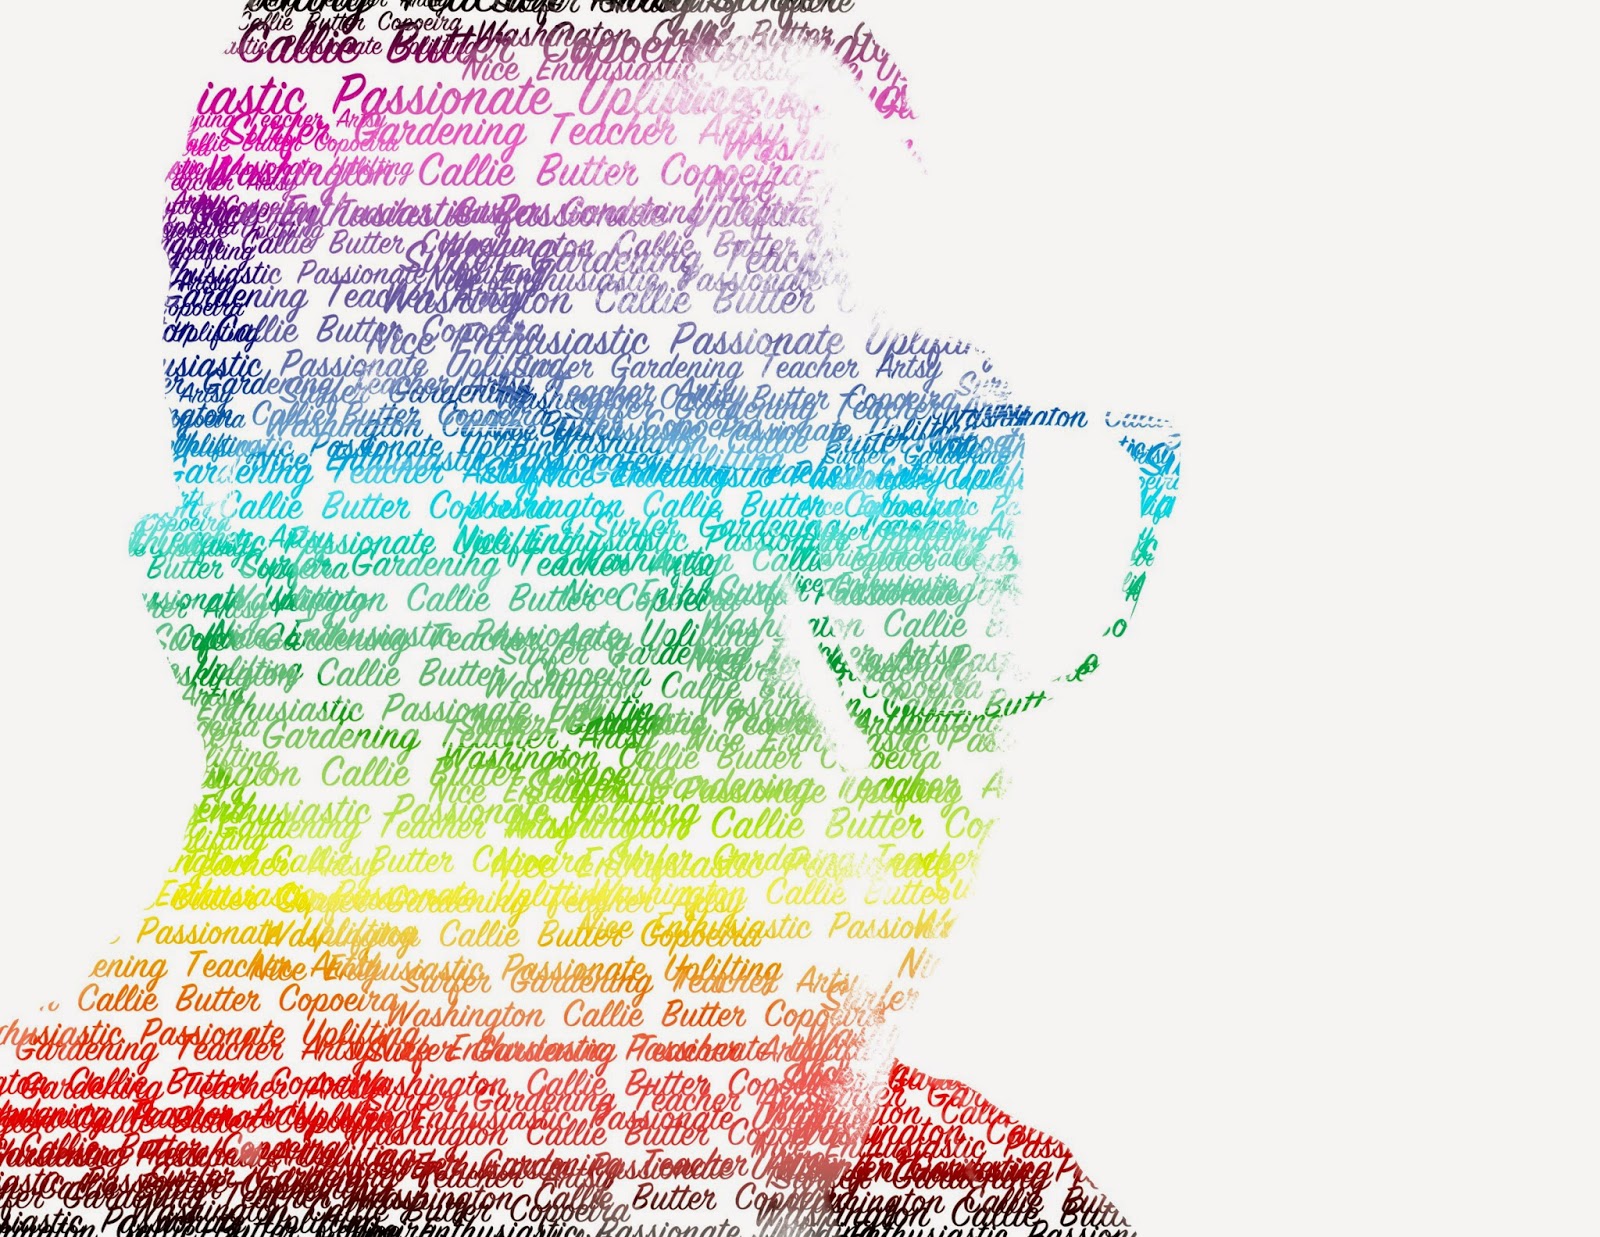
 My favorite typography portrait of all the ones I did would have to be the Innovator portrait because it was definitely the easiest and to me it looks the best because there's no bright colors and it was really easy to understand and depict who the picture is. The second picture is Mrs. Sanderl and it has the words Passionate, Uplifting, Teacher, Coperia, Callie, and Butter. She said these words describe her and that's what I put.
For my typography portrait, I chose the words Volleyball, V.XXI.MMII, and NY Diaz. I choose these words because volleyball is a very strong passion that I have and I love to do it. I chose V.XXI.MMII because it's my birthday in Roman Numerals and I love birthdays, the more you have the longer you live and you're one step closer to achieving your life long goal. Lastly, I chose NY Diaz because New York is where I was born and where I grew up and it defines me because it's my hometown and that's where my roots come from and where I was made. Diaz is just important because it's my last name and that's pretty basic. 

Monday, March 2, 2015

Double Exposure Portraits

Portrait Photography is a picture of a person or group of people. A profile view is a picture of the side of a person's face, while silhouetting is a dark shape or outline with a lighter background. We used portrait photography to make our Double Exposure and Multi Exposure portraits.

This week, we did double exposure portraits in Photoshop. To make these, we needed a profile view of ourselves and two textural photos to show symbolism. First, it's File > Scripts > Load Files into Stack. You add your three pictures and it all comes out in layers.
Next, you need to use the dodge tool to lighten the areas around your face to make it completely white. After that's finished, you need to change all your blending modes to "Screen". And then you become, kind of transparent but you can see your background pictures. To make it look really cool, I made my background photos invert colors and they came out a nice purple by going to Layer > New Adjustment Layer, then using whatever look cool.
Practice
The symbolism in my two visual samples are the clouds and the horizon. I always wondered what's beyond the clouds and space and what's in other galaxies. For my other visual of the horizon line, I've always wanted to travel and see what's beyond the curves of the Earth and past where the eye can see. My quality of work could've improved by having my visuals be more unique and trying to think outside of the box more. 
Multi Exposure

Monday, February 9, 2015

HDR Photography


HDR Photography stands for high dynamic range imaging and it's exactly what it sounds like. It's a method used to add more "dynamic range" into photos. Dynamic range is a ratio from light to dark. When you take a regular photo, it's just one. When you use HDR, you take 7 photos taken from all different exposures. We use Photoshop to layer these 7 images and highlight the best parts of the photo. I like HDR sometimes, when it's used right but other times it just makes things look terrible.

To create an HDR image, you take 7 photos at different exposures from -3 to +3 without moving the camera at all and then going into photoshop to put it all together. In Photoshop, you go to File > Automate > Merge to HDR. Photoshop does it thing and then allows you to edit what HDR image it gave you. This,  I think this is very different from automatic HDR, like the thing on your iPhone. When you do you it on your phone, it's way less drastic then when you would do it professionally in Photoshop.


Friday, January 23, 2015

Movie Trailer Critique


For most of 2nd Quarter, our project was to create a Movie Trailer and Poster. We decided to do ours on a old legend, The Lady In White. The Lady In White, is an old myth originated in the Phillipines. My teammates were Daileen Barton, Taylor Chang and Tu Nguyen. For our Trailer Plan document we had to write all our scenes, our movie synopsis, our voice acting script, and and the plot, story, and meaning.

The project requirements were quite simple really. We had to make the trailer as appropriate as possible so 1st grade level kids could watch it. We were told to put our poster in the trailer, have a minimum of 5 scenes, our timing had to be between 1:30-2:30 minutes, a voice acting script, dialogue, and foley. We completed most of them, what we didn't really do was make it 1st grade appropriate.

For our class critique, for audience we got mostly satisfactory which I agree. I don't think it was "Above and Beyond!" but it wasn't so bad. I learned to mostly follow requirements and rules and you might be a little more satisfied with what you come out with it.

Friday, December 12, 2014

Movie Poster Promo

In our latest G.T project, The main character in my movie poster is my one teammate, Daileen Barton, basically becasue she plays the most important character. She's centered in the middle of the poster and just kinda be standing there with all cool layer effects around her being that it is a horror movie.

Our title is pretty basic really, it's the name of the ghost, ya know. "The White Lady". All the other text is just the production house, credits, characters names, critics, when it's gonna come to theathers, and the slogan. Kerning is spacing between letters and lines. I think it's important to use because of the fact that you need to make your title look good becasue it's the first thing people are gonna see before they see your movie and if your movie poster and title look bad, there go your views. See how good you are at it.

I think layer effects and filters had a huge part in the making of our poster to make it look scarier.